
Can’t see your Gmail tabs anymore? Follow this quick step-by-step guide to enable and restore them in under a minute.
.png)
You open Gmail and the Primary, Social, and Promotions tabs are gone. The inbox feels crowded, and important emails blend into everything else.
When you realize your Gmail tabs are missing, the fix sits inside one precise setting that takes less than a minute to restore. The layout change looks major, but the correction is simple.
Once you see where the toggle lives, control returns instantly. From here, the focus shifts to restoring your inbox structure with clarity and speed.
Gmail does not remove tabs without reason. A small layout or configuration shift inside your inbox usually changes how categories display.
1. Primary Cause: Inbox Type Change
When the inbox type switches away from default, category tabs stop appearing. This often happens after using Gmail on a different computer or adjusting settings inside your Google account.
2. Category Display Was Turned Off
Inside settings, users can disable categories without realizing it. Once hidden, the inbox shows a single stream of messages instead of separate tabs.
3. Filters Override Sorting Logic
A custom filter can move certain mail directly into labels or archives. When that happens, those messages skip the tab view entirely.
4. Interface Modified By An Extension
A chrome extension or newly added extension can alter Gmail’s layout. Some tools simplify the interface and unintentionally remove the tab strip.
5. View Changes Through The Menu
Using the top right three dots menu and adjusting layout options can affect how tabs display, especially if you scroll through compact or priority views.
Example
You enable a productivity add-on, refresh Gmail, and your Promotions tab disappears. Disabling the extension restores the standard layout instantly.
Once you identify which setting shifted, the solution becomes mechanical and fast. Now let’s restore the tabs across every device in under a minute.

The process is slightly different on desktop and mobile, but the control is the same. You are simply restoring the Default inbox layout so the tabs reappear.
Below are the steps broken down clearly by device.
On a computer, you access full layout controls from Gmail settings. This method gives you direct control over inbox categories.
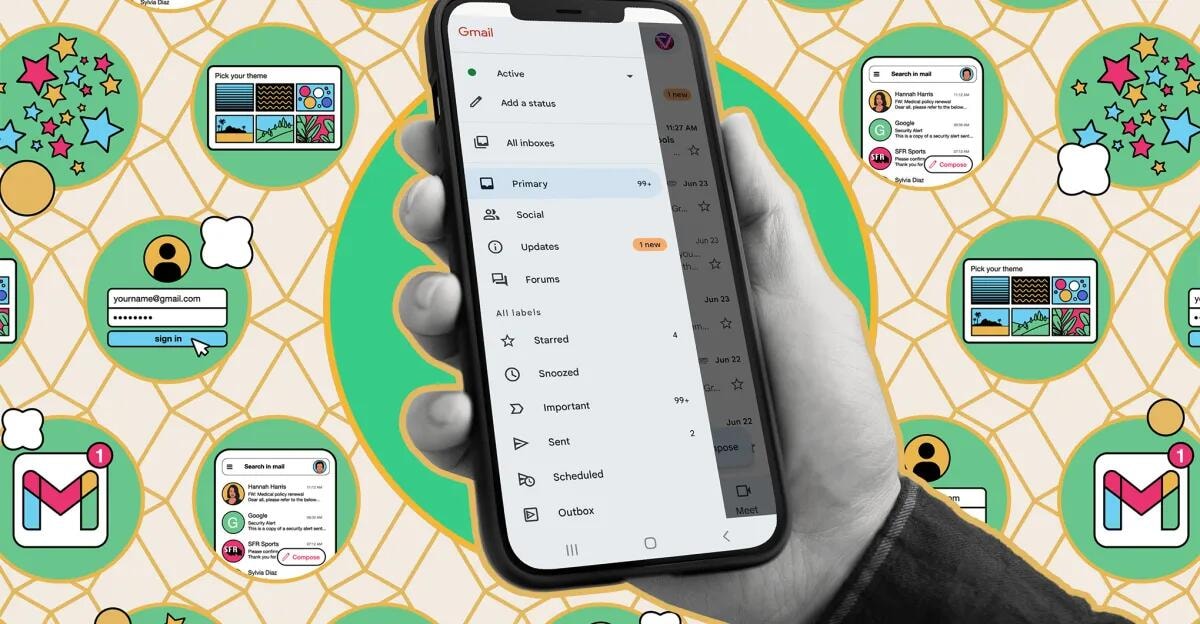
1. Open Gmail And Go To Your Inbox
2. Click The Gear Icon In The Top Right
3. Click Settings And Choose “See All Settings”
4. Under Inbox Type, Select Default
5. In The Category Section, Select The Inbox Category Options You Want, Including Primary And Promotions
6. Scroll Down And Click Save
The tabs appear instantly at the top of the inbox once saved.
On mobile devices, layout options are inside the side menu. The structure is simpler but follows the same logic.
1. Open The Gmail App
2. Tap The Menu Icon
3. Scroll And Tap Settings
4. Select Your Account
5. Tap Inbox Type And Choose Default
6. Enable The Categories You Want
The inbox refreshes automatically after selection.
Once this layout is restored, Gmail returns to its organized tab view. Next, we’ll cover what to do if the tabs do not remain enabled after saving.
If your tabs keep disappearing after you enable them, the issue is usually a missed save step, a setting that reverts, or something overriding Gmail’s layout in the background. The goal is to make the change stick once and confirm it remains stable across devices.
1. Confirm You Saved The Change
The most common issue is leaving settings before the save action registers.
2. Check For Add-Ons Interfering
An extension can modify how Gmail renders your inbox.
3. Recheck After Account Sync
Sometimes Gmail updates across devices with a short delay, and it can also take a moment to confirm whether your message was actually delivered or opened, especially if you rely on Gmail delivery and read tracking for important emails.
4. Review Filters That Affect Visibility
A filter can redirect messages and make it appear as if the layout reverted.
Once the tabs remain enabled, the layout becomes stable and predictable. Next, we’ll refine how the tabs are arranged so your inbox works the way you prefer.
Once tabs are back, customization is what makes them useful. The goal is to reduce clutter, shorten decision time, and make your inbox feel predictable when you open it, just like choosing an email service that fits how you work in the first place. .
1. Decide What Deserves A Tab
Start by choosing categories based on what you actually receive, not what Gmail assumes.
2. Train Gmail With Real Message Moves
Gmail learns from what you move, not what you wish it understood.
3. Add Labels For Your Own Logic
Tabs sort broadly, labels sort precisely. Use them when you need a system that matches your work, or when you want more advanced organization similar to combining multiple emails into one in Outlook.
4. Make Scanning Faster On Desktop
Small layout habits improve speed and reduce mental load.
Example
You follow several communities and newsletters. Moving those messages into Forums, then labeling a few high priority threads cuts your email search time sharply.
When your tabs match how you think, Gmail becomes easier to use in seconds, not minutes. Next, we’ll fix the most common tab issues so your setup stays stable day to day.
Tab issues usually come from how Gmail classifies messages, not from the tabs themselves. The quickest fixes are the ones that either retrain sorting or remove the one rule that keeps overriding your inbox.
1. “I Want To Create Tabs, But I Can’t”
Gmail does not let you build custom tabs like folders. Tabs are fixed categories, so the practical workaround is to sort with labels and filters instead of trying to create new ones.
2. Emails From Communities Land In The Wrong Place
Messages from online groups often behave like conversations, so Gmail may keep them in Primary. If you want a cleaner separation, move those threads into Forums and Gmail adjusts over time.
3. Social Content Clutters The Inbox
Emails from media sharing sites can flood the Social tab and pull attention away from actual work. Disable Social if you never check it, or move a few key senders into Primary so only high value items stay visible while you focus on contacts that matter for building and nurturing your email list. .
4. Promotions Still Feel Messy After Tabs Are On
If Promotions still looks noisy, you need cleaner boundaries, especially if you rely on ecommerce email templates to drive sales.
5. Important Mail Gets Buried In Labels Or Views
This happens when you rely on labels for everything, then forget where an email landed. For better easy access, keep one or two labels for critical flows, and leave the rest to tabs.
6. You “Lost” An Email After Cleanup
This is usually an archive or label issue, not deletion. Before you assume it was deleted, use search with the sender name or subject and confirm where it moved.
7. Replies Are Splitting Across Tabs
When one thread includes promotions, receipts, and personal replies, Gmail struggles to categorize it cleanly. Move the thread once to the tab you prefer and Gmail usually follows that pattern for future messages.
Example
A client sends a project update from a billing system, and the email lands in Promotions. Moving it to Primary once makes future project messages from that sender easier to find.
These quick fixes keep your inbox consistent without constant manual cleanup. Next, we’ll lock in habits that stop tab changes from resurfacing again.
Tabs disappear again when small habits keep nudging Gmail back into a different layout. Prevention is about locking the few choices that control your inbox view, then avoiding the triggers that quietly reset it.
1. Keep Your Inbox Layout Consistent
A stable routine keeps Gmail more user friendly. Stick to one preferred inbox setup, especially if you switch devices often.
2. Limit Changes That Reset The View
Quick tweaks add up, and they usually happen without intention.
3. Reduce The “Constant Tinkering” Loop
When you adjust things too often, you end up spending more time sorting than reading. Treat your inbox like a system, set it once, then maintain it lightly.
4. Use Search As Your Safety Net
If an email feels “missing,” do not chase tabs for five minutes. Use a targeted query with a sender name or subject line and you will usually find it instantly.
5. Make One Simple Rule For Important Threads
Choose where your important conversations should live and keep them there. That one rule matters more than perfect categorization.
Example
You check Gmail on a new laptop while traveling, the layout looks different, and you keep working anyway. Fixing it on the spot saves confusion later, especially when you return to your main device.
A consistent inbox stays predictable, even when your devices change, and it also makes it easier to run high-converting email campaigns for new products without losing key responses in the clutter.
Next, we’ll close with focused answers to the most frequent edge-case questions. .
No. Gmail labels organize emails using tags, while tabs automatically sort emails into preset categories. Labels are manual or filter-based, whereas tabs are behavior-based. Both can work together, but they serve different purposes.
Gmail categories are the system that classifies emails, while tabs are the visual interface that displays those categories in your inbox. Categories power the sorting, tabs display the result.
No. Changing your inbox category layout only affects how emails appear inside your inbox. It does not impact whether messages are delivered, delayed, or marked as spam.
Yes. Gmail tabs work with personal Gmail accounts and Google Workspace accounts. Admin-level settings may restrict certain layouts, but the feature is generally available.
No. If Gmail tabs are missing then they concern inbox layout only. Search, archive, and starred emails function independently of tab configuration.
A missing tab rarely signals a serious problem. It usually points to one layout choice that shifted and can be corrected in seconds.
If you ever see Gmail Tabs Missing again, open your settings, confirm the Default inbox type, and move on without second guessing the interface. The system responds quickly when you adjust it with intention.
Keep your layout consistent, train it when needed, and treat your inbox as a tool, not a puzzle. Precision keeps it organized, and consistency keeps it that way.


